Looking to set up Chrome on your Windows 11 system? Dive into our comprehensive guide to learn the ins and outs of the installation process.
From downloading Chrome to customizing settings, we’ve got you covered every step of the way.
Introduction
Windows 11 is the latest operating system released by Microsoft, offering a fresh and modern user interface along with several new features and improvements. One essential aspect of optimizing your Windows 11 experience is installing Google Chrome, a popular web browser known for its speed, security, and compatibility with various websites and applications.
Importance of Installing Chrome on Windows 11
Installing Chrome on Windows 11 is crucial for users who rely on a fast and reliable web browsing experience. Chrome offers seamless synchronization across devices, a wide range of extensions for customization, and robust security features to protect your online activities. By installing Chrome, users can enhance their productivity and enjoy a smoother browsing experience on Windows 11.
Methods of Installing Chrome
When it comes to installing Google Chrome on your Windows 11 computer, there are several methods you can use. Whether you prefer downloading from the official website, using the Microsoft Store, or exploring alternative methods, we’ve got you covered.
Downloading Chrome from the Official Website
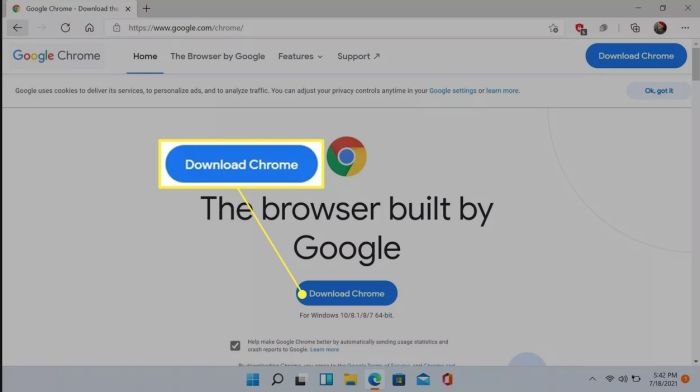
To download Google Chrome from the official website, simply visit the Chrome website and click on the “Download Chrome” button. Follow the on-screen instructions to complete the installation process. This method ensures you get the latest version of Chrome directly from the source.
Using Microsoft Store to Install Chrome
If you prefer a more streamlined approach, you can also install Chrome from the Microsoft Store. Simply search for Google Chrome in the Microsoft Store and click on the “Install” button. The installation will be handled automatically through the Store, making it convenient for users who prefer this method.
Alternative Methods of Installing Chrome on Windows 11
If you’re looking for alternative methods to install Chrome on Windows 11, you can explore options such as using third-party software repositories or package managers. Some users also choose to download Chrome from trusted sources other than the official website. However, it’s important to exercise caution and ensure you’re downloading from a reputable source to avoid potential security risks.
System Requirements
To ensure a smooth experience while using Chrome on Windows 11, it is important to meet the minimum system requirements. Below are the hardware specifications, storage space, and RAM recommendations for optimal performance.
Minimum Hardware Specifications
- Processor: 1 gigahertz (GHz) or faster with 2 or more cores on a compatible 64-bit processor
- Graphics card: Compatible with DirectX 12 or later with a WDDM 2.0 driver
- System memory: 4 GB RAM or higher
- Storage: 64 GB or larger storage device
- UEFI firmware version: Secure Boot capable
- TPM: Trusted Platform Module (TPM) version 2.0
Storage Space Required
Chrome installation requires a minimum of 500 MB of free disk space. However, for a more seamless experience and to accommodate updates and temporary files, it is recommended to have at least 2 GB of free storage space.
RAM Recommendations
For optimal performance, it is recommended to have 8 GB of RAM or higher when running Chrome on Windows 11. This ensures smoother multitasking and efficient browsing experience.
Installation Process
Now that you know the system requirements and methods of installing Chrome on Windows 11, let’s dive into the step-by-step guide for downloading Chrome, along with troubleshooting common installation issues.
Downloading Chrome on Windows 11
Follow these steps to download Chrome on your Windows 11 system:
- Open your web browser and go to the official Chrome website.
- Click on the “Download Chrome” button.
- Review the Terms of Service and click “Accept and Install.”
- Once the download is complete, open the installer file.
- Follow the on-screen instructions to complete the installation process.
Screenshots Illustrating Installation Steps
Below are screenshots illustrating each installation step:
Image 1: Chrome website with “Download Chrome” button highlighted
Image 2: Terms of Service window with “Accept and Install” button
Image 3: Chrome installer file downloading
Image 4: Installation completion confirmation
Troubleshooting Installation Issues
If you encounter any common installation issues, try the following troubleshooting steps:
- Ensure your internet connection is stable.
- Disable any antivirus software temporarily during installation.
- Check for Windows updates and install any pending updates.
- Run the Chrome installer as an administrator.
- Restart your computer and try reinstalling Chrome.
Setting Chrome as Default Browser
To fully integrate Chrome into your Windows 11 system, setting it as the default browser is essential. This ensures that all web links and browsing activities automatically open with Chrome.
Process Comparison with Windows 10
In Windows 10, the process of setting Chrome as the default browser involved navigating through the system settings and selecting Chrome from a list of available browsers. However, in Windows 11, the process has been streamlined and made more user-friendly.
Benefits of Using Chrome as Default Browser on Windows 11
- Enhanced Performance: Chrome is optimized to work seamlessly with Windows 11, providing a faster and smoother browsing experience.
- Sync Across Devices: By setting Chrome as the default browser, you can easily sync your browsing history, bookmarks, and settings across all your devices.
- Customization Options: Chrome offers a wide range of customization options, allowing you to personalize your browsing experience according to your preferences.
- Security Features: Chrome comes equipped with advanced security features to protect your data and privacy while browsing the internet.
Customizing Chrome on Windows 11

Chrome offers various customization options to enhance your browsing experience on Windows 11. You can personalize settings, install extensions, and explore features specific to this operating system.
Personalizing Chrome settings on Windows 11
Customizing Chrome settings allows you to tailor the browser to your preferences and needs. Here are some key settings you can adjust:
- Change the default search engine
- Manage cookies and site permissions
- Customize themes and appearance
- Enable or disable specific features like hardware acceleration
Installing extensions for enhanced browsing experience
Extensions are add-ons that provide additional functionality to Chrome. By installing extensions, you can customize Chrome to suit your specific requirements. Some popular extensions include:
- Ad blockers to eliminate unwanted ads
- Password managers for enhanced security
- Productivity tools like to-do lists and note-taking apps
- Extensions for social media integration
Exploring Chrome features specific to Windows 11
Chrome is optimized for Windows 11, offering unique features that take advantage of the capabilities of this operating system. Some features you can explore include:
- Integration with Windows 11 taskbar and snap layouts
- Support for touch and pen input on compatible devices
- Enhanced security features for a safer browsing experience
- Seamless syncing with other Windows 11 devices
Last Recap

In conclusion, installing Chrome on Windows 11 is a breeze with our detailed instructions. Enjoy a seamless browsing experience on your new OS!