Ready to install Google Chrome on your Mac? Look no further! This guide will walk you through the process seamlessly, ensuring a smooth installation experience from start to finish.
From downloading the installer to configuring Chrome settings, we’ve got you covered every step of the way. Let’s dive in!
Overview of Google Chrome Installation on Mac
When it comes to installing Google Chrome on a Mac, the process is straightforward and user-friendly. Below are the key points to consider:
Downloading and Installing Google Chrome
- Visit the official Google Chrome website to download the installation file for Mac.
- Double-click on the downloaded file to begin the installation process.
- Follow the on-screen instructions to complete the installation.
System Requirements
- Mac OS X 10.10 or later is required to run Google Chrome smoothly.
- Minimum of 2GB RAM for optimal performance.
- At least 500MB of free disk space for installation.
Benefits of Using Google Chrome on Mac
- Fast and efficient browsing experience with minimal lag.
- Seamless integration with Google services like Gmail, Drive, and others.
- Customizable features and extensions to enhance productivity.
Tips for a Smooth Installation Process
- Ensure your Mac meets the system requirements before starting the installation.
- Close any other applications to prevent interruptions during the installation.
- Regularly update Google Chrome to enjoy the latest features and security enhancements.
Downloading Google Chrome Installer for Mac
To install Google Chrome on your Mac, you first need to download the official installer from a secure source. Here’s how you can do it:
Official Source and Security
- Official Source: The official source to download the Google Chrome installer for Mac is the Chrome website at https://www.google.com/chrome/ .
- Secure Download: To ensure the download is from a secure source, always download the installer directly from the official website. Avoid downloading from third-party sources to prevent malware or viruses.
File Size and Download Time
- File Size: The file size of the Google Chrome installer for Mac is approximately 100MB.
- Download Time: The download time for the installer on a typical Mac will depend on your internet connection speed. On a standard broadband connection, it should take a few minutes to download.
Alternative Sources
- Alternative Sources: If you prefer not to download from the official website, you can also obtain the installer from trusted software download sites like CNET or Softonic. However, always exercise caution and verify the source before downloading.
Installing Google Chrome on Mac
To install Google Chrome on your Mac, follow these steps:
Running the Installer
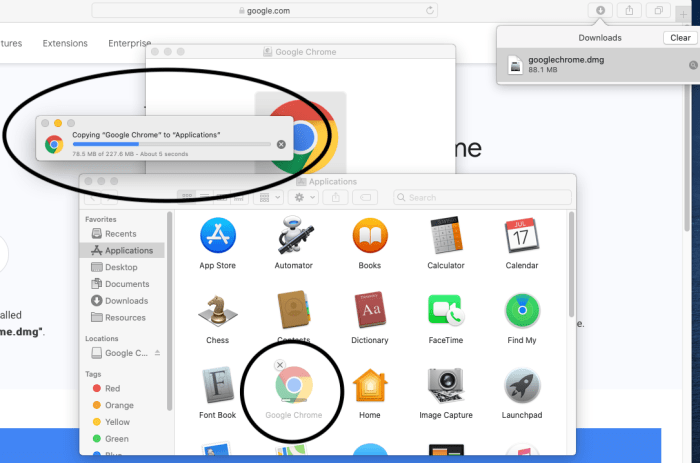
- Locate the downloaded Google Chrome installer file in your Downloads folder.
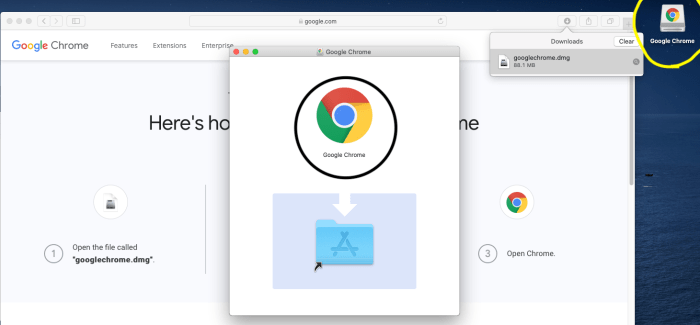
- Double-click on the installer file to open it.
- Drag the Google Chrome icon to the Applications folder to install the browser on your Mac.
- Once the installation is complete, you can find Google Chrome in your Applications folder.
Additional Permissions
During the installation process, you may be prompted to enter your administrator password to allow the installation to proceed.
Setting Chrome as Default Browser
- Open Google Chrome on your Mac.
- Click on “Chrome” in the top menu bar.
- Select “Preferences” from the dropdown menu.
- In the Preferences window, click on “Default Browser” in the sidebar.
- Choose “Google Chrome” from the dropdown menu to set it as your default browser.
Troubleshooting Installation Issues
If you encounter any issues during the installation process, try the following troubleshooting tips:
- Make sure you have a stable internet connection.
- Restart your Mac and try reinstalling Google Chrome.
- Check for any conflicting software that may be hindering the installation.
- Download the installer from the official Google Chrome website to ensure it is not corrupted.
- Reach out to Google Chrome support for further assistance if needed.
Configuring Google Chrome on Mac
Upon installing Google Chrome on your Mac, you will need to go through the initial setup process to customize the browser according to your preferences. This includes adjusting settings, syncing across devices, and enhancing security measures for a safer browsing experience.
Customizing Chrome Settings
- Access the Chrome menu by clicking on the three dots in the top right corner of the browser window.
- From the menu, navigate to “Settings” to customize various options such as homepage, search engine, privacy settings, and appearance.
- Explore advanced settings by clicking on “Advanced” to further personalize your browsing experience.
Syncing Chrome Across Devices
- Sign in to your Google account in Chrome to sync your bookmarks, history, passwords, and other settings across all your devices.
- This feature allows you to seamlessly switch between your Mac, iPhone, iPad, or any other device with Chrome installed.
- Ensure synchronization is enabled in the settings to access your data across platforms.
Enhancing Security and Privacy
- Enable safe browsing in Chrome settings to protect yourself from phishing, malware, and other online threats.
- Regularly update Chrome to ensure you have the latest security patches and features.
- Consider using Chrome extensions like ad blockers and password managers for added security and privacy.
Summary
With this comprehensive guide, you’re now equipped to make the most out of Google Chrome on your Mac. Say goodbye to installation hassles and hello to a seamless browsing experience. Happy browsing!