Embark on a journey into the world of Sonatype Nexus Install, where software development meets efficiency and reliability. Unravel the secrets of seamless installation and configuration for optimal performance.
Overview of Sonatype Nexus Install
Sonatype Nexus is a repository manager used in software development to store and manage dependencies, artifacts, and other components. It helps streamline the build process, improve collaboration among developers, and ensure the quality and security of the software being developed.Installing Sonatype Nexus in a development environment is crucial for maintaining a centralized location for all dependencies and artifacts needed for the project.
This helps in avoiding version conflicts, ensures consistency across different environments, and facilitates easier sharing and reuse of components within the development team.
Importance of Sonatype Nexus Install
- Preventing version conflicts: By centralizing dependencies, Sonatype Nexus helps in avoiding conflicts that may arise due to different versions being used by different developers.
- Enhancing collaboration: With a centralized repository, developers can easily share and reuse components, leading to improved collaboration and faster development cycles.
- Ensuring quality and security: Sonatype Nexus allows for the implementation of security measures and quality checks on dependencies, ensuring that only approved and safe components are used in the software.
Examples of Companies Using Sonatype Nexus
- Google: Google uses Sonatype Nexus to manage dependencies and artifacts across its various development teams working on different projects.
- Amazon: Amazon relies on Sonatype Nexus to ensure consistency and security in the software components used in its e-commerce platform and cloud services.
- Netflix: Netflix utilizes Sonatype Nexus to streamline the build process and manage dependencies efficiently for its streaming services and applications.
System Requirements
Before installing Sonatype Nexus, it is crucial to ensure that your system meets the minimum hardware and software requirements. This will help in smooth installation and optimal performance of the software.
Minimum Hardware Requirements
- At least 2 CPU cores
- 4 GB of RAM
- 10 GB of available disk space
Minimum Software Requirements
- Operating System: Linux, Windows, or macOS
- Java Development Kit (JDK) 8 or later
Dependencies and Prerequisites
Before starting the installation process, make sure to have the following dependencies and prerequisites in place:
- Ensure that JDK is properly installed and configured on your system.
- Verify that you have administrative rights to install software on the system.
- Check for any firewall or network restrictions that might interfere with the installation process.
Ensuring System Readiness
Before proceeding with the installation of Sonatype Nexus, it is recommended to:
- Run system updates to ensure that your operating system is up to date.
- Check disk space availability to accommodate the software and its dependencies.
- Verify that the JDK version meets the minimum requirements specified.
Installation Process
Installing Sonatype Nexus involves several steps to ensure a successful setup. There are different methods available for installation, including manual installation, package managers, and containerization. Let’s explore the installation process and some best practices for a smooth installation experience.
Manual Installation
For manual installation, you can download the Nexus Repository Manager from the official Sonatype website. Extract the downloaded package to a desired location on your server. Configure the necessary settings and start the Nexus service. This method provides more control over the installation process but requires manual configuration.
Package Managers
Alternatively, you can use package managers like Yum or Apt to install Sonatype Nexus on Linux-based systems. Package managers simplify the installation process by handling dependencies and updates automatically. You can easily install and manage Nexus using your preferred package manager.
Containerization
Containerization with tools like Docker allows you to deploy Nexus as a containerized application. This method offers portability and scalability, making it easier to manage Nexus instances across different environments. By containerizing Nexus, you can streamline the installation and deployment process.
It is recommended to regularly update Sonatype Nexus to the latest version to ensure security patches and new features are applied.
Remember to follow the official installation guides provided by Sonatype for detailed instructions on each installation method. By choosing the right installation method based on your requirements, you can set up Sonatype Nexus efficiently and effectively.
Configuration and Setup
After installing Sonatype Nexus, the next step is to configure it according to your specific needs. This involves setting up repositories, users, and permissions to ensure optimal performance.
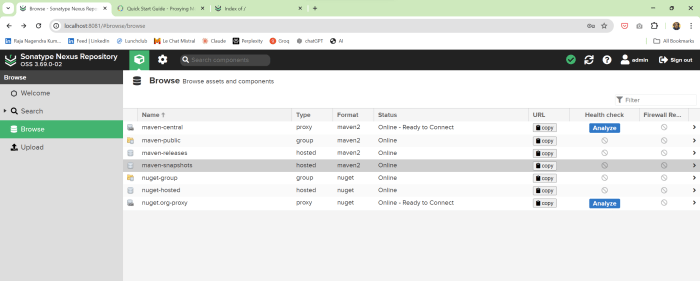
Setting up Repositories
- Create repositories for storing different types of artifacts such as release builds, snapshots, third-party libraries, and proxy repositories.
- Configure repository formats, storage locations, and access controls based on your organization’s requirements.
- Regularly clean up repositories to remove outdated or unused artifacts and optimize storage space.
Setting up Users and Permissions
- Create user accounts for individuals or teams who will be accessing the Nexus repository manager.
- Assign appropriate roles and permissions to users to control their access to repositories and specific actions within Nexus.
- Implement strong password policies and enable multi-factor authentication for added security.
Post-Installation Tasks for Optimal Performance
- Regularly monitor and analyze Nexus logs and metrics to identify performance bottlenecks or issues.
- Optimize JVM settings and memory allocation based on the size of your repository and usage patterns.
- Set up scheduled backups of Nexus data to prevent data loss in case of hardware failures or system crashes.
Integration with Development Tools
When it comes to integrating Sonatype Nexus with popular development tools like Jenkins, Maven, or Gradle, developers can streamline their workflows and enhance efficiency in the software development process.
Integration with Jenkins
- Developers can configure Jenkins to automatically trigger builds whenever a new component is pushed to Nexus Repository Manager.
- Integration with Jenkins ensures continuous integration and delivery, helping teams to deliver high-quality software faster.
Integration with Maven and Gradle
- By integrating Sonatype Nexus with Maven or Gradle, developers can easily manage dependencies and artifacts, ensuring that the right components are used in their projects.
- Sonatype Nexus acts as a central repository for storing build artifacts, making it easier for developers to share and reuse components across projects.
Benefits of Integration
- Improved build reliability: By centralizing dependencies and artifacts in Sonatype Nexus, developers can ensure consistency and reliability in their builds.
- Enhanced security: Sonatype Nexus provides vulnerability scanning and license compliance features, helping teams to identify and mitigate security risks in their dependencies.
- Efficient collaboration: Integrating Nexus with development tools fosters collaboration among team members, enabling seamless sharing of components and artifacts.
Summary
In conclusion, mastering the installation of Sonatype Nexus is key to enhancing your development environment. By following the best practices and leveraging its integration capabilities, you pave the way for a streamlined and efficient software development process.