Embark on your Verizon WiFi installation journey with this comprehensive guide that covers everything you need to know from setup to troubleshooting.
Learn about the equipment required, pre-installation steps, installation process, testing, activation, and more in this detailed overview.
Overview of Verizon WiFi Install
Setting up Verizon WiFi in a new location is a straightforward process that ensures reliable and fast internet connectivity.
For a successful installation, you will need the following equipment:
Equipment Required
- Verizon WiFi Router: This is the central hub that connects all your devices to the internet.
- Modem: Transforms the internet signal into a format that can be used by your devices.
- Coaxial Cable: Connects the modem to the wall outlet for internet access.
- Ethernet Cable: Used to connect the modem to the WiFi router for a stable connection.
- Power Cords: Essential for powering up the modem and WiFi router.
By choosing Verizon for WiFi installation, you can enjoy various benefits:
Benefits of Choosing Verizon
- High-Speed Internet: Verizon offers fast internet speeds for seamless browsing, streaming, and gaming.
- Reliable Connection: Experience a stable and consistent connection without interruptions.
- 24/7 Customer Support: Get assistance from Verizon’s customer support team anytime you encounter issues with your WiFi.
- Secure Network: Verizon prioritizes the security of your network to keep your personal information safe.
- Flexible Plans: Choose from a variety of plans that suit your internet usage and budget.
Pre-Installation Steps
Before beginning the installation of Verizon WiFi, there are several important tasks that need to be completed to ensure a smooth and successful process.
Checklist of Tasks:
- Verify that you have all the necessary equipment provided by Verizon for the installation.
- Ensure that you have a stable internet connection to download any required software or updates during the installation.
- Check the area where you plan to install the WiFi for any obstructions or interference that could affect signal strength.
- Make sure you have the login credentials and any other information needed to set up the WiFi network.
Considerations for Smooth Installation:
- Clear any clutter or obstacles in the installation area to make the process easier.
- Plan ahead for any potential issues by having a backup plan in case of connectivity problems.
- Inform all users in the household about the installation to avoid interruptions during the process.
Checking Compatibility:
Before starting the Verizon WiFi installation, it is crucial to ensure compatibility with your existing hardware and infrastructure. Here are some steps to check for compatibility:
- Review the system requirements provided by Verizon to make sure your devices meet the necessary specifications.
- Check if your modem/router is compatible with Verizon’s services to avoid any connectivity issues.
- Test the internet speed in your home to determine if it meets the minimum requirements for Verizon WiFi.
- Contact Verizon customer support if you have any doubts or need assistance with checking compatibility.
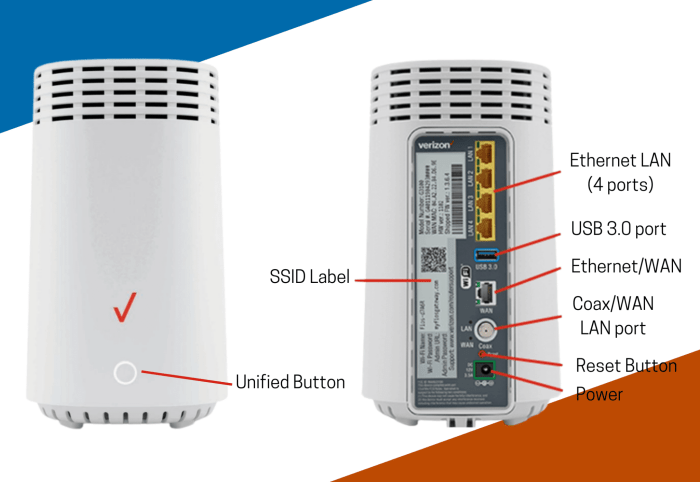
Installation Process
Once you have completed the pre-installation steps, it’s time to set up your Verizon WiFi. Follow the step-by-step guide below to ensure a smooth installation process.
Connecting Devices
- Connect the Verizon WiFi router to a power source and turn it on.
- Use an Ethernet cable to connect the router to your modem.
- Wait for the router to establish a connection with the modem.
Configuring Network Settings
- Open a web browser on a device connected to the WiFi network.
- Enter the router’s IP address in the browser’s address bar.
- Log in using the default username and password provided with the router.
- Follow the on-screen instructions to configure your network settings, such as network name (SSID) and password.
Troubleshooting Tips
- If you are experiencing connectivity issues, try restarting the router and modem.
- Ensure that the Ethernet cable is securely connected to both the router and modem.
- Check for any firmware updates for your router and install them if available.
- Contact Verizon customer support for further assistance if the issue persists.
Testing and Activation
After the Verizon WiFi installation process is complete, it is essential to test the connection to ensure everything is functioning correctly. Additionally, activating the Verizon WiFi service is crucial to start enjoying a stable and secure internet connection. Here’s how you can test and activate your Verizon WiFi:
Testing the WiFi Connection
- Ensure all cables are properly connected and the WiFi router is powered on.
- Locate the WiFi network name (SSID) and password provided by Verizon.
- On your device (smartphone, laptop, tablet), search for available WiFi networks and select your Verizon WiFi network.
- Enter the password when prompted and wait for the device to connect to the network.
- Open a web browser and try to access a website to confirm internet connectivity.
Activating Verizon WiFi Service
Activating your Verizon WiFi service is simple and can usually be done online or by contacting Verizon customer support.
- Visit the Verizon website and log in to your account to activate the service.
- Follow the instructions provided on the website to activate your WiFi service.
- If you encounter any issues, contact Verizon customer support for assistance.
Ensuring a Secure and Stable Connection
- Change the default SSID and password to a unique, secure combination to prevent unauthorized access.
- Enable WPA2 encryption on your WiFi network for added security.
- Regularly update the firmware on your WiFi router to ensure optimal performance and security.
- Keep your WiFi network password confidential and avoid sharing it with unauthorized users.
Last Word
In conclusion, mastering the Verizon WiFi installation process can lead to a seamless and efficient network setup that ensures a stable and secure connection for all your online needs.